
In 2018, workers rediscovered the power of the strike with nearly 500,000 people walking off the job, compared to just 25,000 in 2017. This year has proven even more of the same, with 442,700 stopping work through September.
Portside is an independent news outlet of labor activists who volunteer their time to scour the web for thoughtful, authentic coverage and analysis of worker power. In June they won the "Labor Communicator of the Year" as a result of their efforts.
Getting meaningful information on strikes is difficult. Just six corporations own 90% of media in the US. Executives like Jeff Bezos and Rupert Murdoch have a vested interest in downplaying worker power. That coupled with sophisticated misinformation campaigns and obscure social media algorithms, it's hard to cut to what's happening on the ground.
We work with Portside to help them reach as many people as possible. In 2018 we upgraded the site from Drupal 7 to Drupal 8, optimizing the website for mobile devices and adding moderation tools to make editors' lives easier.
This year we sent out a survey to readers to learn what else would be helpful to provide the coverage so many are seeking in these politically charged moments.
Nearly 500 people responded, and the feedback was overwhelmingly positive. That said, there's always room for improvement.
In 2019, we hope to roll out the following features to help us all follow and support the labor movement and left in general.
* Improved "Related News" functionality - Right now the articles suggested are a bit hit or miss. We need time to adjust and improve our algorithm for this.
* Create "Issue" pages - the Bolivia coup, the Rojava Revolution, the Chicago Teachers' Strike... the number of progressive, transformative, and often revolutionary movements gaining traction is dizzying. Portside provides excellent coverage, but not in a long-term, coherent way. Issue pages will help us follow breaking news, with the broader context we need to be in meaningful solidarity. Editors are already hard at work cleaning up the tagging system for articles. We just need the time to design and build out these issue pages to better serve readers.
Just these two improvements will make a real difference to how well we can stay informed of what our fellow workers are up to and how we can support them.
This same functionality is theoretically possible for other list fields, but In Other Words does not currently support summarizing text and numeric lists. We have opened a feature request to do so, but do not currently have the need ourselves, so we welcome your involvement. Feel free to open issues about things you think would make the module better, too!
A final note. We went through considerable effort to allow In Other Words' conjoining symbols and words, as well as surrounding text, to appear immediately before or after the items in a list with no whitespace. (Note: This does not work when Twig debugging is enabled.) This means you can have information presented as a sentence that ends with a period, "Open Tuesday–Friday." It also means that if you want spacing you need to ensure you add it as part of your join symbol or separator, your final join word, and your before and after text. This is a common gotcha in configuring In Other Words field formatters that you, perhaps, can now avoid!
Envíenos un correo electrónico a preguntar@agaric.coop, llámenos al +1 508 283 3557, o use este formulario a continuación, y uno de los trabajadores-propietarios de Agaric se comunicará con usted.
Lorem ipsum dolor sit amet, consectetur adipiscing elit. Maecenas tempus, nibh non finibus sollicitudin, ligula magna tempus nibh, ut maximus libero lorem ut sem. Nunc tincidunt sit amet enim in euismod. Fusce dignissim feugiat bibendum. Aliquam erat volutpat. Aliquam eu sem id nulla varius scelerisque et sit amet ipsum. Nulla scelerisque vestibulum felis, a porttitor turpis imperdiet nec. Nam id laoreet nibh. Aenean quis elit cursus, vehicula nibh a, aliquam mauris. Vestibulum facilisis vestibulum cursus. Pellentesque auctor libero id condimentum commodo. Suspendisse potenti. Maecenas diam sem, ornare in ex porttitor, euismod lacinia dolor. Vestibulum ante ipsum primis in faucibus orci luctus et ultrices posuere cubilia Curae; Sed sollicitudin fermentum massa. Sed et ipsum nec massa consequat lobortis sed non quam. Donec rhoncus condimentum quam sed gravida.
We are experts in Drupal migrations. We can move content from your old site to your Drupal 8, 9, or 10 site so that you can keep working with all of your old content, all while gaining access to the flexibility, functionality, and forward-compatibility of modern Drupal.
Perhaps most important, while helping improve your content architecture and moving everything to your upgraded site, we will preserve your old site's SEO, which may have been years in the making. Agaric migrations keeps crucial paths on your site—which have been indexed by search engines, linked to from around the web, and bookmarked by your visitors—working or redirected to equivalent content.
Whether you are merging seven types of content containers (that were all basically blog posts) into one—or splitting a ninety field complex posting form into different content types with appropriate functionality for different purposes—we make your old content work the way you want to work now. By improving your old content, not only improving your website around it, you gain the flexibility to repurpose the old content for the lengthening tail of new ways of using old content. Devices and channels are continually changing, and it's not just about displaying content any more. Audio formats are increasingly popular, and providing access to your content as data, to be remixed or related to other content can make your website content much more than an archive. We bring your old content into new environments where its value can be unlocked.
The professionals come to us
Other (excellent!) web development shops often contract out to us for help with the content migration portion of site rebuilds and rebrands that they are working on, especially the hardest parts.
Similarly, clients will hire us for capacity building for migrations specifically. Agaric can provide a combination of services to give you the ability to get your website upgrade done well and efficiently. For example, we can train internal staff to be able to take on more migration and development work, without needing us. And we can also, at the same time, take on the most complex parts of the migration that do not seem likely to need repeating, or we can help where you get stuck.
Dan left Agaric in 2011 to go forth on his own, leaving behind some famous quotations:
Like a nine-year-old in high school.
And:
That's why you'll be a small seller of custom drupal pretzels...
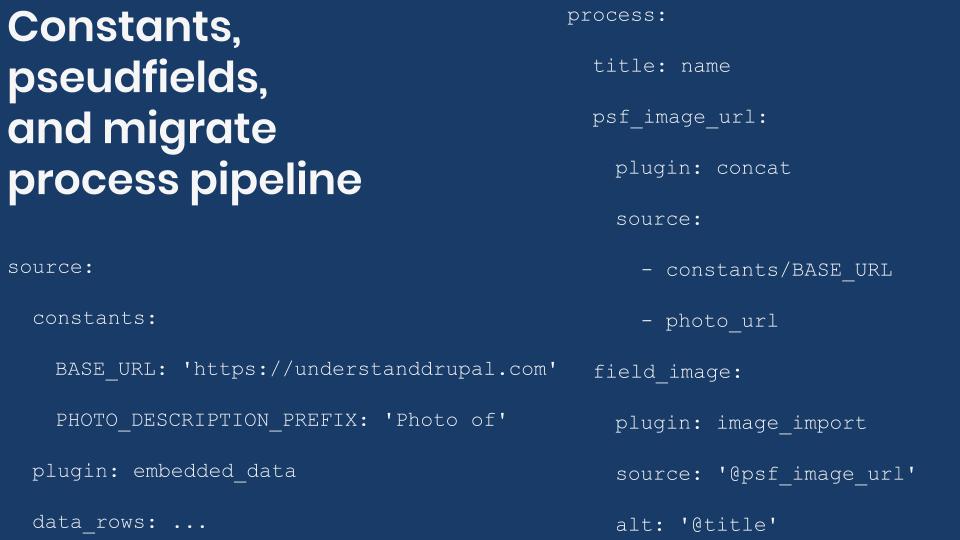
So far we have learned how to write basic Drupal migrations and use process plugins to transform data to meet the format expected by the destination. In the previous entry we learned one of many approaches to migrating images. In today’s example, we will change it a bit to introduce two new migration concepts: constants and pseudofields. Both can be used as data placeholders in the migration timeline. Along with other process plugins, they allow you to build dynamic values that can be used as part of the migrate process pipeline.
Setting and using constants
In the Migrate API, a constant is an arbitrary value that can be used later in the process pipeline. They are set as direct children of the source section. You write a constants key whose value is a list of name-value pairs. Even though they are defined in the source section, they are independent of the particular source plugin in use. The following code snippet shows a generalization for settings and using constants:
source:
  constants:
    MY_STRING: 'http://understanddrupal.com'
    MY_INTEGER: 31
    MY_DECIMAL: 3.1415927
    MY_ARRAY:
      - 'dinarcon'
      - 'dinartecc'
  plugin: source_plugin_name
  source_plugin_config_1: source_config_value_1
  source_plugin_config_2: source_config_value_2
process:
  process_destination_1: constants/MY_INTEGER
  process_destination_2:
    plugin: concat
    source: constants/MY_ARRAY
    delimiter: ' '
You can set as many constants as you need. Although not required by the API, it is a common convention to write the constant names in all uppercase and using underscores (_) to separate words. The value can be set to anything you need to use later. In the example above, there are strings, integers, decimals, and arrays. To use a constant in the process section you type its name, just like any other column provided by the source plugin. Note that you use the constant you need to name the full hierarchy under the source section. That is, the word constant and the name itself separated by a slash (/) symbol. They can be used to copy their value directly to the destination or as part of any process plugin configuration.
Technical note: The word constants for storing the values in the source section is not special. You can use any word you want as long as it does not collide with another configuration key of your particular source plugin. A reason to use a different name is that your source actually contains a column named constants. In that case you could use defaults or something else. The one restriction is that whatever value you use, you have to use it in the process section to refer to any constant. For example:
source:
  defaults:
    MY_VALUE: 'http://understanddrupal.com'
  plugin: source_plugin_name
  source_plugin_config: source_config_value
process:
  process_destination: defaults/MY_VALUE
Setting and using pseudofields
Similar to constants, pseudofields stores arbitrary values for use later in the process pipeline. There are some key differences. Pseudofields are set in the process section. The name is arbitrary as long as it does not conflict with a property name or field name of the destination. The value can be set to a verbatim copy from the source (a column or a constant) or they can use process plugins for data transformations. The following code snippet shows a generalization for settings and using pseudofields:
source:
  constants:
    MY_BASE_URL: 'http://understanddrupal.com'
  plugin: source_plugin_name
  source_plugin_config_1: source_config_value_1
  source_plugin_config_2: source_config_value_2
process:
  title: source_column_title
  my_pseudofield_1:
    plugin: concat
    source:
      - constants/MY_BASE_URL
      - source_column_relative_url
    delimiter: '/'
  my_pseudofield_2:
    plugin: urlencode
    source: '@my_pseudofield_1'
  field_link/uri: '@my_pseudofield_2'
  field_link/title: '@title'
In the above example, my_pseudofield_1 is set to the result of a concat process transformation that joins a constant and a column from the source section. The result value is later used as part of a urlencode process transformation. Note that to use the value from my_pseudofield_1 you have to enclose it in quotes (') and prepend an at sign (@) to the name. The new value obtained from URL encode operation is stored in my_pseudofield_2. This last pseudofield is used to set the value of the URI subfield for field_link. The example could be simplified, for example, by using a single pseudofield and chaining process plugins. It is presented that way to demonstrate that a pseudofield could be used as direct assignments or as part of process plugin configuration values.
Technical note: If the name of the subfield can be arbitrary, how can you prevent name clashes with destination property names and field names? You might have to look at the source for the entity and the configuration of the bundle. In the case of a node migration, look at the baseFieldDefinitions() method of the Node class for a list of property names. Be mindful of class inheritance and method overriding. For a list of fields and their machine names, look at the “Manage fields” section of the content type you are migrating into. The Field API prefixes any field created via the administration interface with the string field_. This reduces the likelihood of name clashes. Other than these two name restrictions, anything else can be used. In this case, the Migrate API will eventually perform an entity save operation which will discard the pseudofields.
Understanding Drupal Migrate API process pipeline
The migrate process pipeline is a mechanism by which the value of any destination property, field, or pseudofield that has been set can be used by anything defined later in the process section. The fact that using a pseudofield requires to enclose its name in quotes and prepend an at sign is actually a requirement of the process pipeline. Let’s see some examples using a node migration:
- To use the title property of the node entity, you would write @title
- To use the field_body field of the Basic page content type, you would write @field_body
- To use the my_temp_value pseudofield, you would write @my_temp_value
In the process pipeline, these values can be used just like constants and columns from the source. The only restriction is that they need to be set before being used. For those familiar with the rewrite results feature of Views, it follows the same idea. You have access to everything defined previously. Anytime you use enclose a name in quotes and prepend it with an at sign, you are telling the migrate API to look for that element in the process section instead of the source section.
Migrating images using the image_import plugin
Let’s practice the concepts of constants, pseudofields, and the migrate process pipeline by modifying the example of the previous entry. The Migrate Files module provides another process plugin named image_import that allows you to directly set all the subfield values in the plugin configuration itself.
As in previous examples, we will create a new module and write a migration definition file to perform the migration. It is assumed that Drupal was installed using the standard installation profile. The code snippets will be compact to focus on particular elements of the migration. The full code is available at https://github.com/dinarcon/ud_migrations The module name is UD Migration constants and pseudofields and its machine name is ud_migrations_constants_pseudofields. The id of the example migration is udm_constants_pseudofields. Refer to this article for instructions on how to enable the module and run the migration. Make sure to download and enable the Migrate Files module. Otherwise, you will get an error like: “In DiscoveryTrait.php line 53: The "file_import" plugin does not exist. Valid plugin IDs for Drupal\migrate\Plugin\MigratePluginManager are:...”. Let’s see part of the source definition:
source:
  constants:
    BASE_URL: 'https://agaric.coop'
    PHOTO_DESCRIPTION_PREFIX: 'Photo of'
  plugin: embedded_data
  data_rows:
    -
      unique_id: 1
      name: 'Michele Metts'
      photo_url: 'sites/default/files/2018-12/micky-cropped.jpg'
      photo_width: '587'
      photo_height: '657'
Only one record is presented to keep snippet short, but more exist. In addition to having a unique identifier, each record includes a name, a short profile, and details about the image. Note that this time, the photo_url does not provide an absolute URL. Instead, it is a relative path from the domain hosting the images. In this example, the domain is https://agaric.coop so that value is stored in the BASE_URL constant which is later used to assemble a valid absolute URL to the image. Also, there is no photo description, but one can be created by concatenating some strings. The PHOTO_DESCRIPTION_PREFIX constant stores the prefix to add to the name to create a photo description. Now, let’s see the process definition:
process:
  title: name
  psf_image_url:
    plugin: concat
    source:
      - constants/BASE_URL
      - photo_url
    delimiter: '/'
  psf_image_description:
    plugin: concat
    source:
      - constants/PHOTO_DESCRIPTION_PREFIX
      - name
    delimiter: ' '
  field_image:
    plugin: image_import
    source: '@psf_image_url'
    reuse: TRUE
    alt: '@psf_image_description'
    title: '@title'
    width: photo_width
    height: photo_height
The title node property is set directly to the value of the name column from the source. Then, two pseudofields. psf_image_url stores a valid absolute URL to the image using the BASE_URL constant and the photo_url column from the source. psf_image_description uses the PHOTO_DESCRIPTION_PREFIX constant and the name column from the source to store a description for the image.
For the field_image field, the image_import plugin is used. This time, the subfields are not set manually. Instead, they are assigned using plugin configuration keys. The absence of the id_only configuration allows for this. The URL to the image is set in the source key and uses the psf_image_url pseudofield. The alt key allows you to set the alternative attribute for the image and in this case the psf_image_description pseudofield is used. For the title subfield sets the text of a subfield with the same name and in this case it is assigned the value of the title node property which was set at the beginning of the process pipeline. Remember that not only psedufields are available. Finally, the width and height configuration uses the columns from the source to set the values of the corresponding subfields.
What did you learn in today’s blog post? Did you know you can define constants in your source as data placeholders for use in the process section? Were you aware that pseudofields can be created in the process section to store intermediary data for process definitions that come next? Have you ever wondered what is the migration process pipeline and how it works? Please share your answers in the comments. Also, I would be grateful if you shared this blog post with your colleagues.
Next: Tips for writing Drupal migrations and understanding their workflow
This blog post series, cross-posted at UnderstandDrupal.com as well as here on Agaric.coop, is made possible thanks to these generous sponsors. Contact Understand Drupal if your organization would like to support this documentation project, whether it is the migration series or other topics.
Find It makes it easier for a small team in government to make sure that there are resources available for a variety of residents' needs.
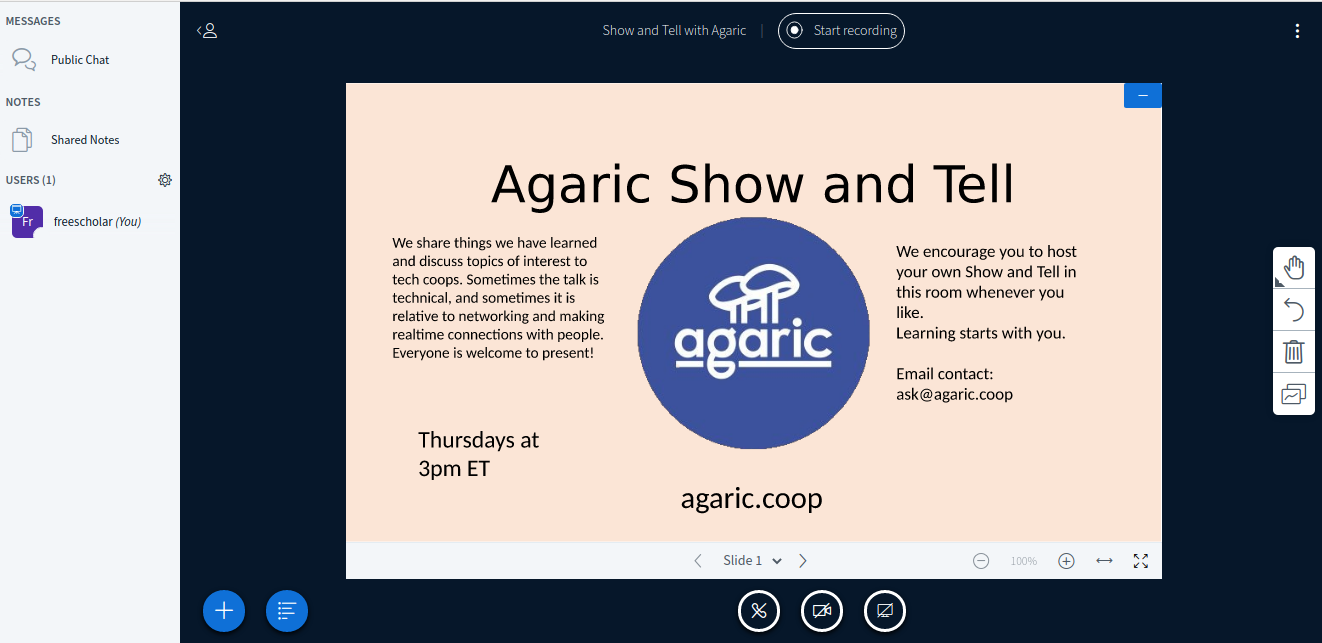
We can look at the recent popularity of some widely used platforms like Zoom and ask ourselves some questions as to why we still use them when we know a lot of terrible things about them. Agaric prefers to use a free/libre video chat software called BigBlueButton for many reasons, the first one being the licensing, but there are many reasons.
Zoom has had some major technology failures, which the corporation is not liable to disclose. At one point, a vulnerability was discovered in the desktop Zoom client for MacOS that allowed hackers to start your webcam remotely and launch you into a meeting without your permission. The company posted a note saying that they fixed the issue. Unfortunately, the Zoom source code is proprietary and we are not even allowed to look at it. There is no way for the community to see how the code works or to verify that the fix was comprehensive.
The Zoom Corporation stated early on that the software was encrypted end-to-end (E2EE) from your device to the recipient's device. This was untrue at the time, but the company states that it has been corrected for users on their client app. While it is no longer true that E2EE is unsupported, it does require that you use the proprietary Zoom client for E2EE to work. Without E2EE, any data that is retrieved on its way from your computer to a server can be accessed! The only real security is knowing the operators of your server. This is why Agaric uses trusted sources like MayFirst.org for most of our projects and we have a relationship with our BigBlueButton host. The Intercept also revealed that Zoom users that dial in on their phone are NOT encrypted at all
BigBlueButton does not have a client app and works in your browser, so there is no E2EE. The idea for E2EE is that with it, you "do not have to trust the server operator and you can rely on E2EE" because the model implies that every client has keys that are protecting the transferred data. However: you MUST still use a proprietary client in order to get the benefits of E2EE support, so once again you MUST trust Zoom as you have no permission to examine the app to determine that the keys are not being shared with Zoom.
Of course there is always the fact that hackers work day and night to corrupt E2EE and a Corporation is not obligated to tell you the customer every time there has been a security breach, and this information is usually buried in the terms of service they post - sometimes with a note saying the terms are subject to change and updates. A Corporation is not obligated to tell you, the customer when there has been a security breach" unless any personal information is exposed. There are now mandatory timely disclosure requirements for all states: https://www.ncsl.org/research/telecommunications-and-information-technology/security-breach-notification-laws.aspx ...Can Zoom really be trusted? As with some laws, the fine that is applied is low and affordable and subject to the interpretation of the courts and the status of knowledge your lawyer is privvy to - meaning most Corporations normally have a battery of lawyers to interpret the law and drag the case out until you are... broke.
In the case of BigBlueButton encryption, E2EE would only make sense if there are separate clients using an API to connect to the BBB server so a user does not have to trust the BBB server operator. If the user trusts the server operator, then there would be no need for E2EE." Lesson learned: It is always best practice to know and trust your server hosts as they are the ones that have the keys to your kingdom.
Some technology analysts consider Zoom software to be malware. Within companies that use Zoom, employers are even able to monitor whether or not you are focusing on the computer screen during meetings which seems excessively intrusive. Speaking of intrusive, the Zoom Corporation also shares your data with FaceBook, even if you do not have a FB account - that could be a whole blog in itself, but just being aware of some of the vulnerabilities is a good thing to pass on. Some of the bad stuff remains even if you uninstall the Zoom app from your device! Even though a class action suit was filed over privacy issues, the company stock still continued to rise.
Those are many reasons why we do not support Zoom. But there are also many reasons why we prefer BBB over Zoom. Besides, BBB has many great features that Zoom lacks:
1. Easily see who is speaking when their name appears above the presentation.
2. Chat messages will remain if you lose your connection or reload and rejoin the room.
3. Video is HD quality and you can easily focus on a persons webcam image.
4. Collaborative document writing on a shared Etherpad.
5. Easily share the presenter/admin role with others in the room.
6. Write closed captions in many languages, as well as change the language of the interface.
7. An interactive whiteboard for collaborative art with friends!

One huge advantage of free software, like BBB, is that you can usually find their issue queue where you can engage with the actual developers to report bugs and request feature enhancements. Here is a link to the BigBlueButton issue queue.
So, why do people keep using a platform like Zoom, even though there are many features in BigBlueButton that are much better?
There is very little publicity for free software and not many know it exists and that there are alternative solutions. You can find some great suggestions of software and switch to it by using this site called switching.software. The marketing budget for Zoom is large and leads you to believe it has everything you will need. Sadly their budget grows larger everyday with the money people pay for subscriptions to the platform. As a result, many people go with it as it is already used by their friends and colleagues, even though there are reports of irresponsible behavior by the Zoom Corporation. This is why the New York school system does not use Zoom and many organizations are following suit. The company gives people a false sense of security as it is widely used and very popular.
Of course, there are reasons to avoid other proprietary chat platforms too...
Agaric offers BigBlueButton for events and meetings. Check out our fun BBB website at CommunityBridge and test drive the video chat yourself!
If this discussion interests you, please share your thoughts with us in the comments.
Looking to learn more about problems with Zoom? There are a lot of articles about Zoom scandals.
- If you need to leak a zoom video without being identified, you need to be very careful!
- Zoom censorship of Palestine seminars sparks fight over academic freedom
- Zoom encryption is not suited for secrets
- Zoom is unclear about whether or not the app is actually end-to-end encrypted, which it isn't.
- And, yes - the wikipedia page has a good summary of some issues
- Stallman provides resources on what is bad about Zoom also
Looking to learn more about protecting your privacy online? These links have some helpful information and videos for tech-savvy people and organic folks alike!
2021 could be the year we all begin to STOP supporting the Corporations that oppress us.
Special thanks to Keegan Rankin for edits!
Ayudamos a las organizaciones a cumplir sus objetivos y fortalecer el movimiento de software libre al proporcionar consultoría en estrategia de tecnología en línea, al crear y personalizar software de alta calidad, capacitar a personas y hablar en eventos.
Estrategía

Utilizamos los principios de justicia de diseño para ayudar a que su presencia en línea alcance sus objetivos y tenga un impacto en el mundo real.
- Formación analítica
- Gobernanza del contenido
- Estrategia de contenido
- Operaciones de contenido
- Estrategia de redes sociales
Desarrollo

Construimos con un software probado que le da poder y control sobre su sitio web y presencia en línea.
- Desarrollo de la gestión de relaciones constituyentes (CRM)
- Migración de contenido
- Desarrollo drupal
- Desarrollo de Django
- Optimización de la donación
- Posicionamiento en buscadores (SEO orgánico)
- Integración de redes sociales
- Seguridad del sitio web y CRM
- Mantenimiento del sitio web
- Afinación del rendimiento del sitio web
- Actualización del sitio web
Usamos y contribuimos con el software libre siempre que sea posible, Creative Commons licencia nuestra documentación y trabajamos bajo un modelo de organización abierta.
Capacitación

Asesoramos y enseñamos, aprovechando su experiencia actual.
- Asesoramiento personalizado uno a uno
- Introducción a Drupal
- Desarrollo del módulo drupal.
- Migración drupal
- Seguridad en linea
Obtenga más información sobre las oportunidades para recibir capacitación de Agaric.
Speaking

Compartimos nuestros conocimientos y promovemos el software libre hablando en eventos.
Los temas incluyen:
- Cómo participar en el Común Digital
- Financiamiento efectivo y gobernanza para el software libre
- Ética en la tecnología
- Software Libre = Sociedad Libre
- Economía solidaria
- Desarrollo cooperativo
- Inteligencia Artificial y Vigilancia
- Poder personal
- Drupal - Comunitario y Técnico
Reserve con nosotros para un próximo evento.
Originally published on the Nonprofit Technology Network's Connect Blog.

Most of us don’t look at our site analytics. At least, not often enough. We know we should, but life gets in the way. How do we make it easier for nonprofits to truly take a “data-driven” approach to their work?
I’ve found success with putting the analytics where people will see them. One of those places is the website itself.
Figure Out What Really Matters
There’s no shortage of data to review. So, it’s important to move beyond vanity metrics and get to the heart of why we do what we do. This means turning to the goals and key performance indicators you have for your website (or defining them for the first time!).
For my work at Agaric, those goals are:
1. Secure well-matched projects by communicating the value we provide to potential clients.
Key performance indicator: feedback on design and content from target audiences.
2. Diversify and expand free software communities by sharing relevant knowledge.
Key performance indicator: pageviews of blog posts.
Each goal should be accompanied by at least one key performance indicator. This is data that tells you how successful you are being at reaching your goal.
In our case, our first goal of feedback is best measured qualitatively by asking our current clients— and those who we like working with—what they think of the website. We conduct interviews to gather that feedback. For our second goal, we can get a good picture of content relevance by pageviews, a valuable data point to share with the team.
A different site might try to increase one-time donations, in which case seeing the number of donations made during a campaign would be helpful. Another group might focus on building a regular readership, therefore email list sign ups are the best indicator of success. Whatever it is, make sure you can link the analytics you are tracking back to a goal you have for your site. There’s no point in measuring something you won’t take action on.
Know Who Needs to See the Data and Where They Hang Out
After identifying your key performance indicators, decide who on your team should review that data.
For our six-person worker-owned cooperative, that answer was easy – all of us. We all blog and we all have a vested interest in helping our free software communities thrive. We want to know which posts are resonating the most.
After knowing your target audience, find out where they spend their time. In our case, it’s the website’s back-end content overview page. Our website admins go here to pull up a page we want to update and to see what posts are still in draft mode. So, we added a column for pageviews and made that column sortable.
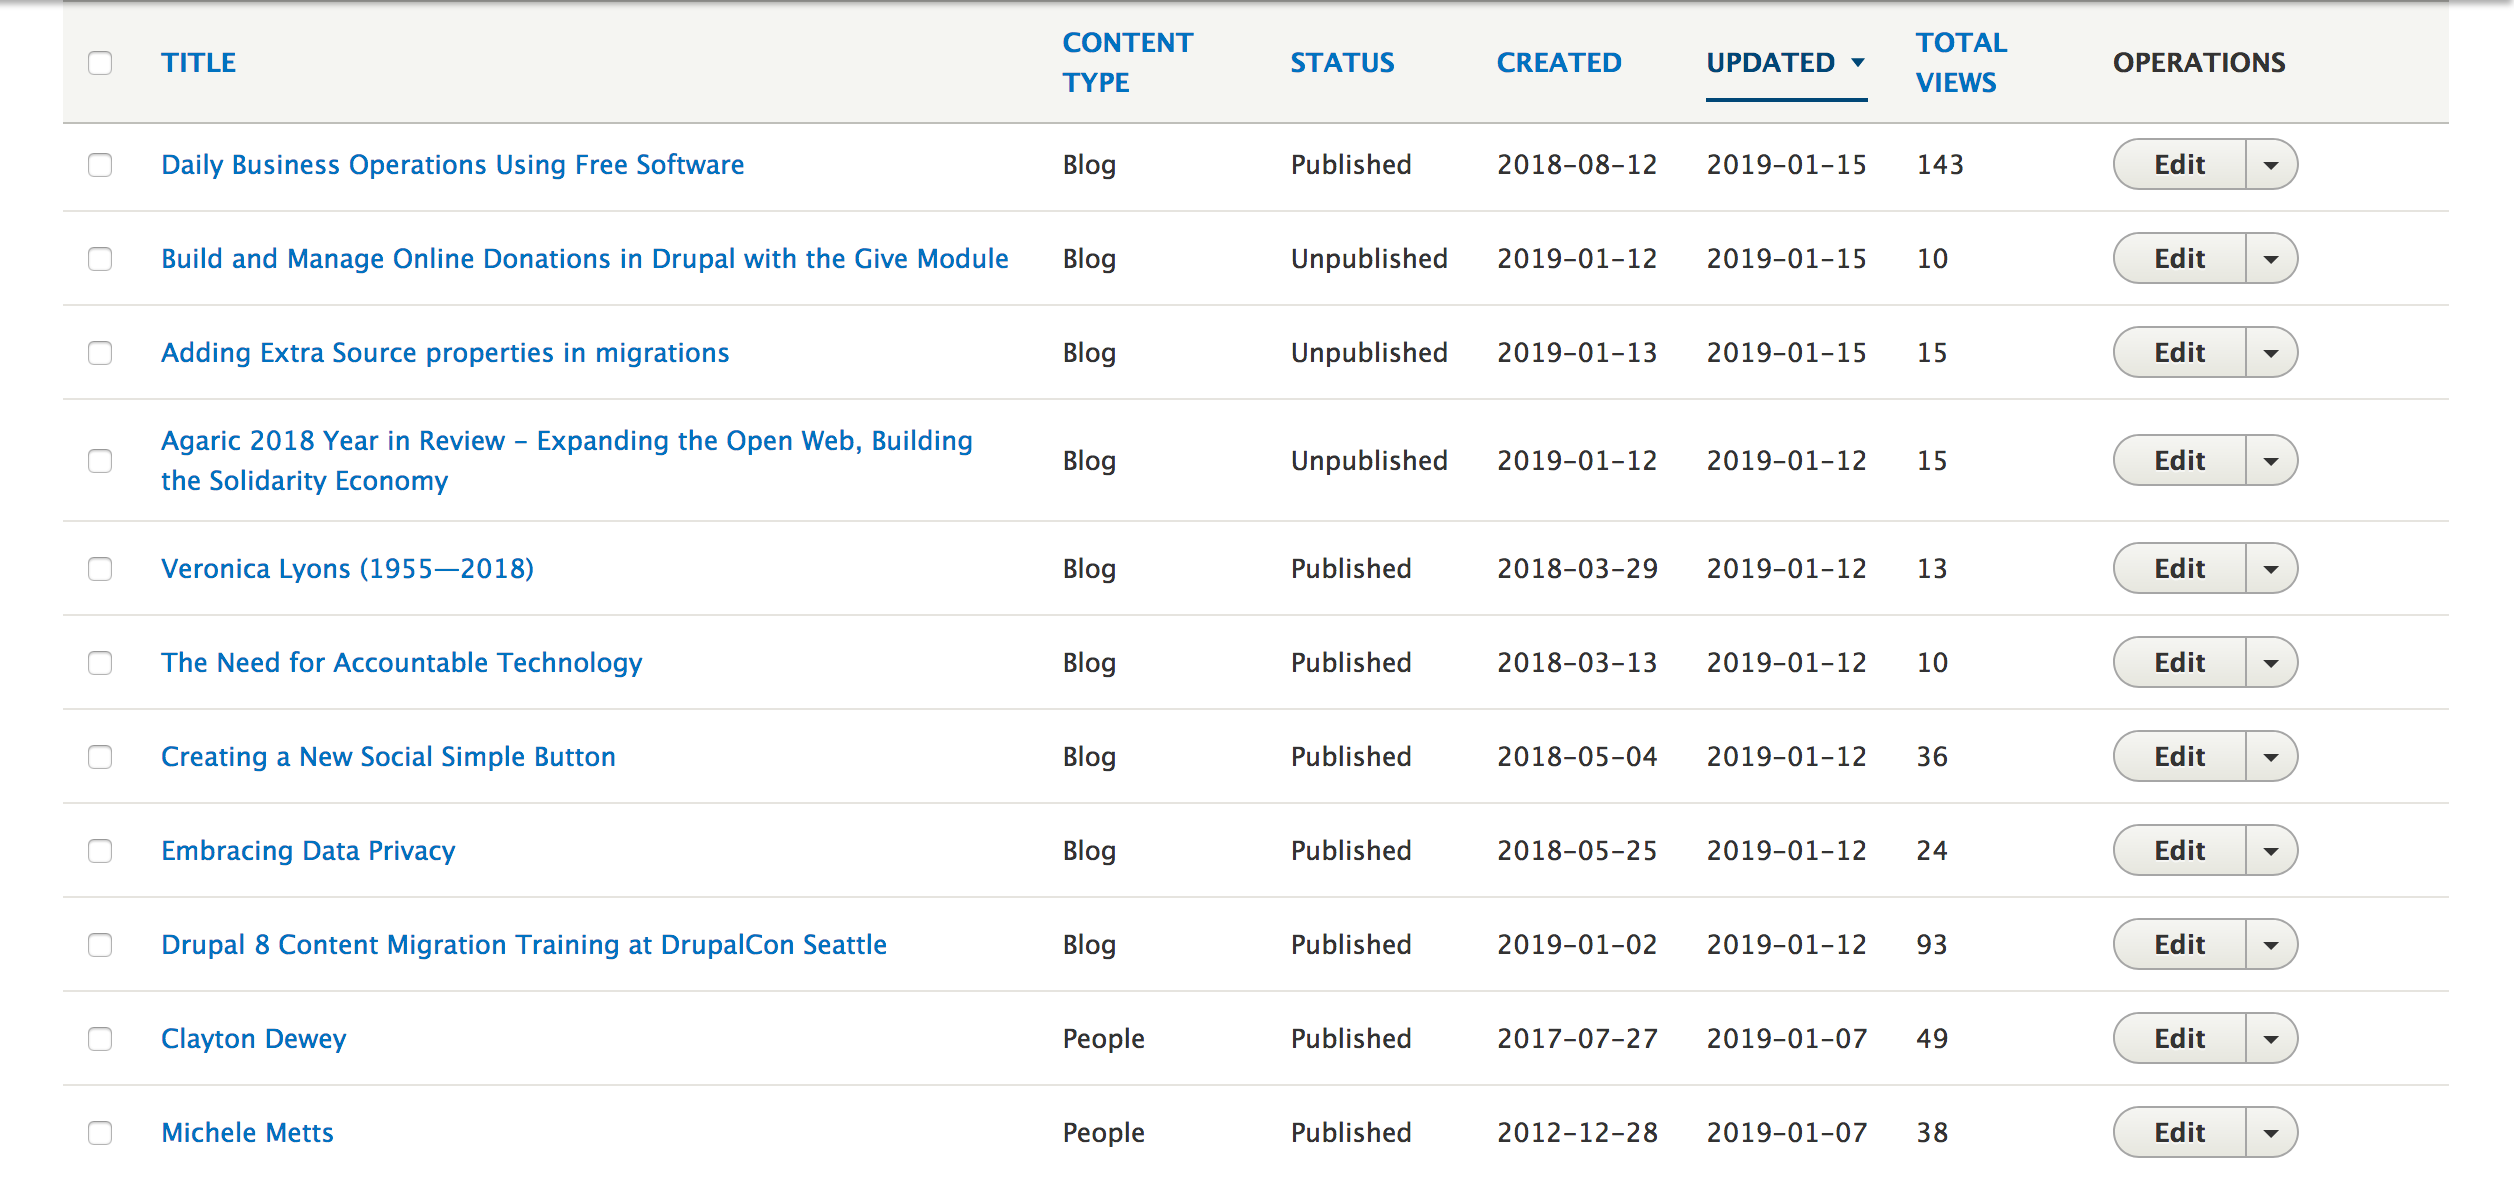 This content overview page was customized to include each post's total pageview count.
For the independent news site Portside, the same was true. In addition to showing pageviews on their content overview page, they also include them directly on each post (visible only to content editors).
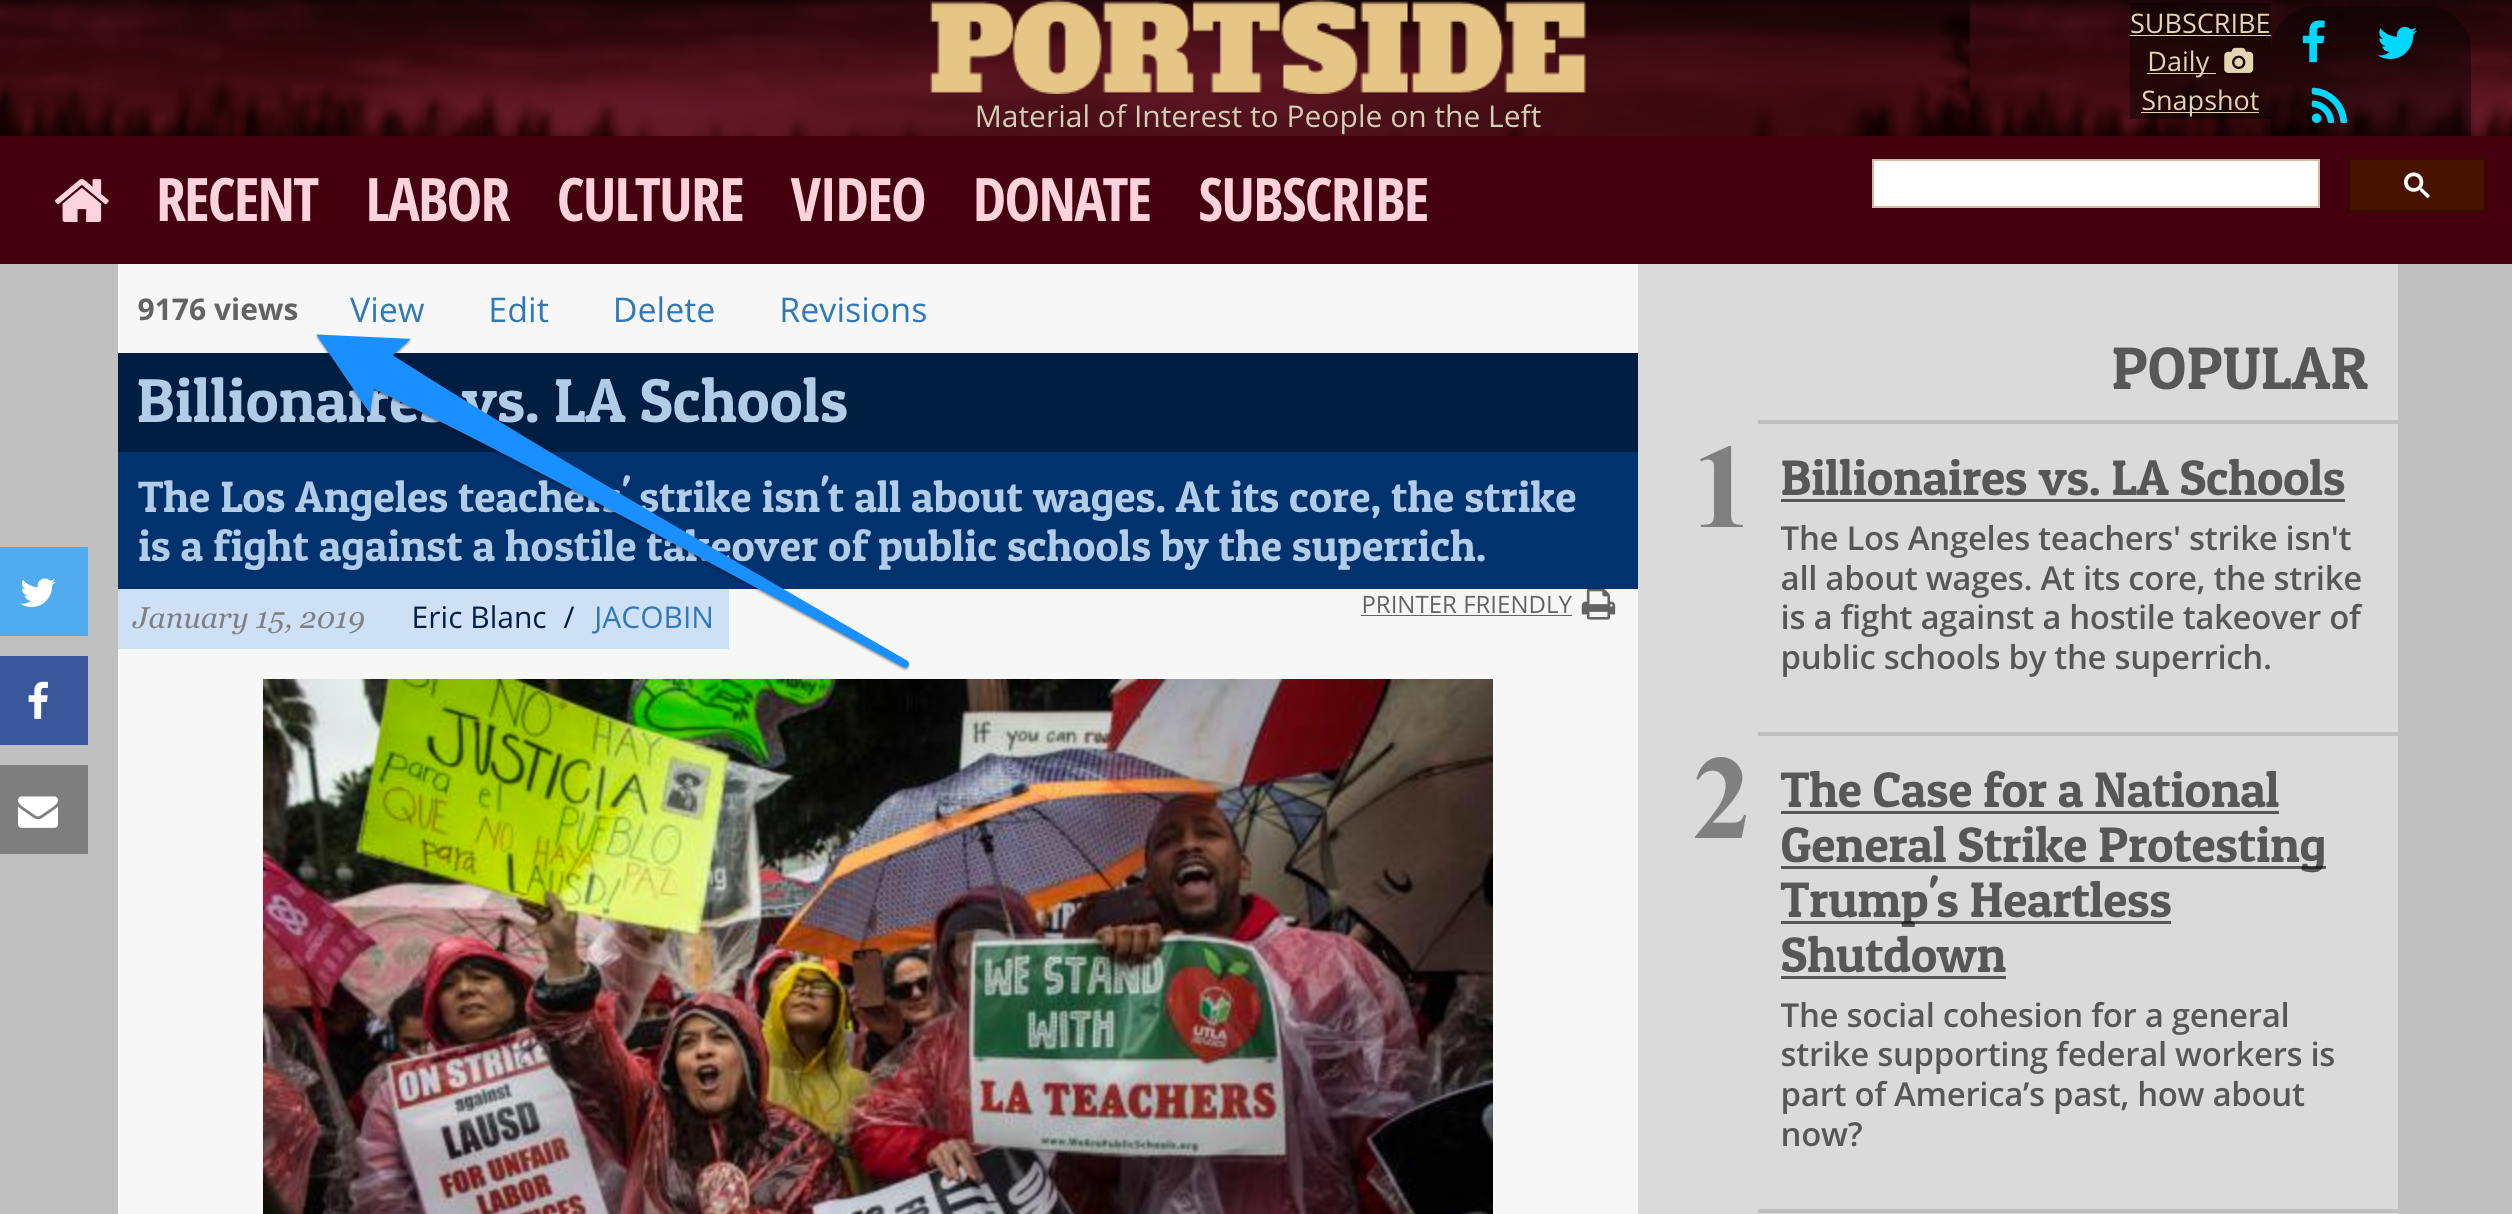 Showing the pageview count on the page itself makes it clear to content editors how popular it is.
For the online educator portal Teachers with Guts, the organization wanted to track several data points on their members’ use of the platform. So, they have a report page built into the site showing information such as the number of downloads made, comments left, and pages bookmarked.
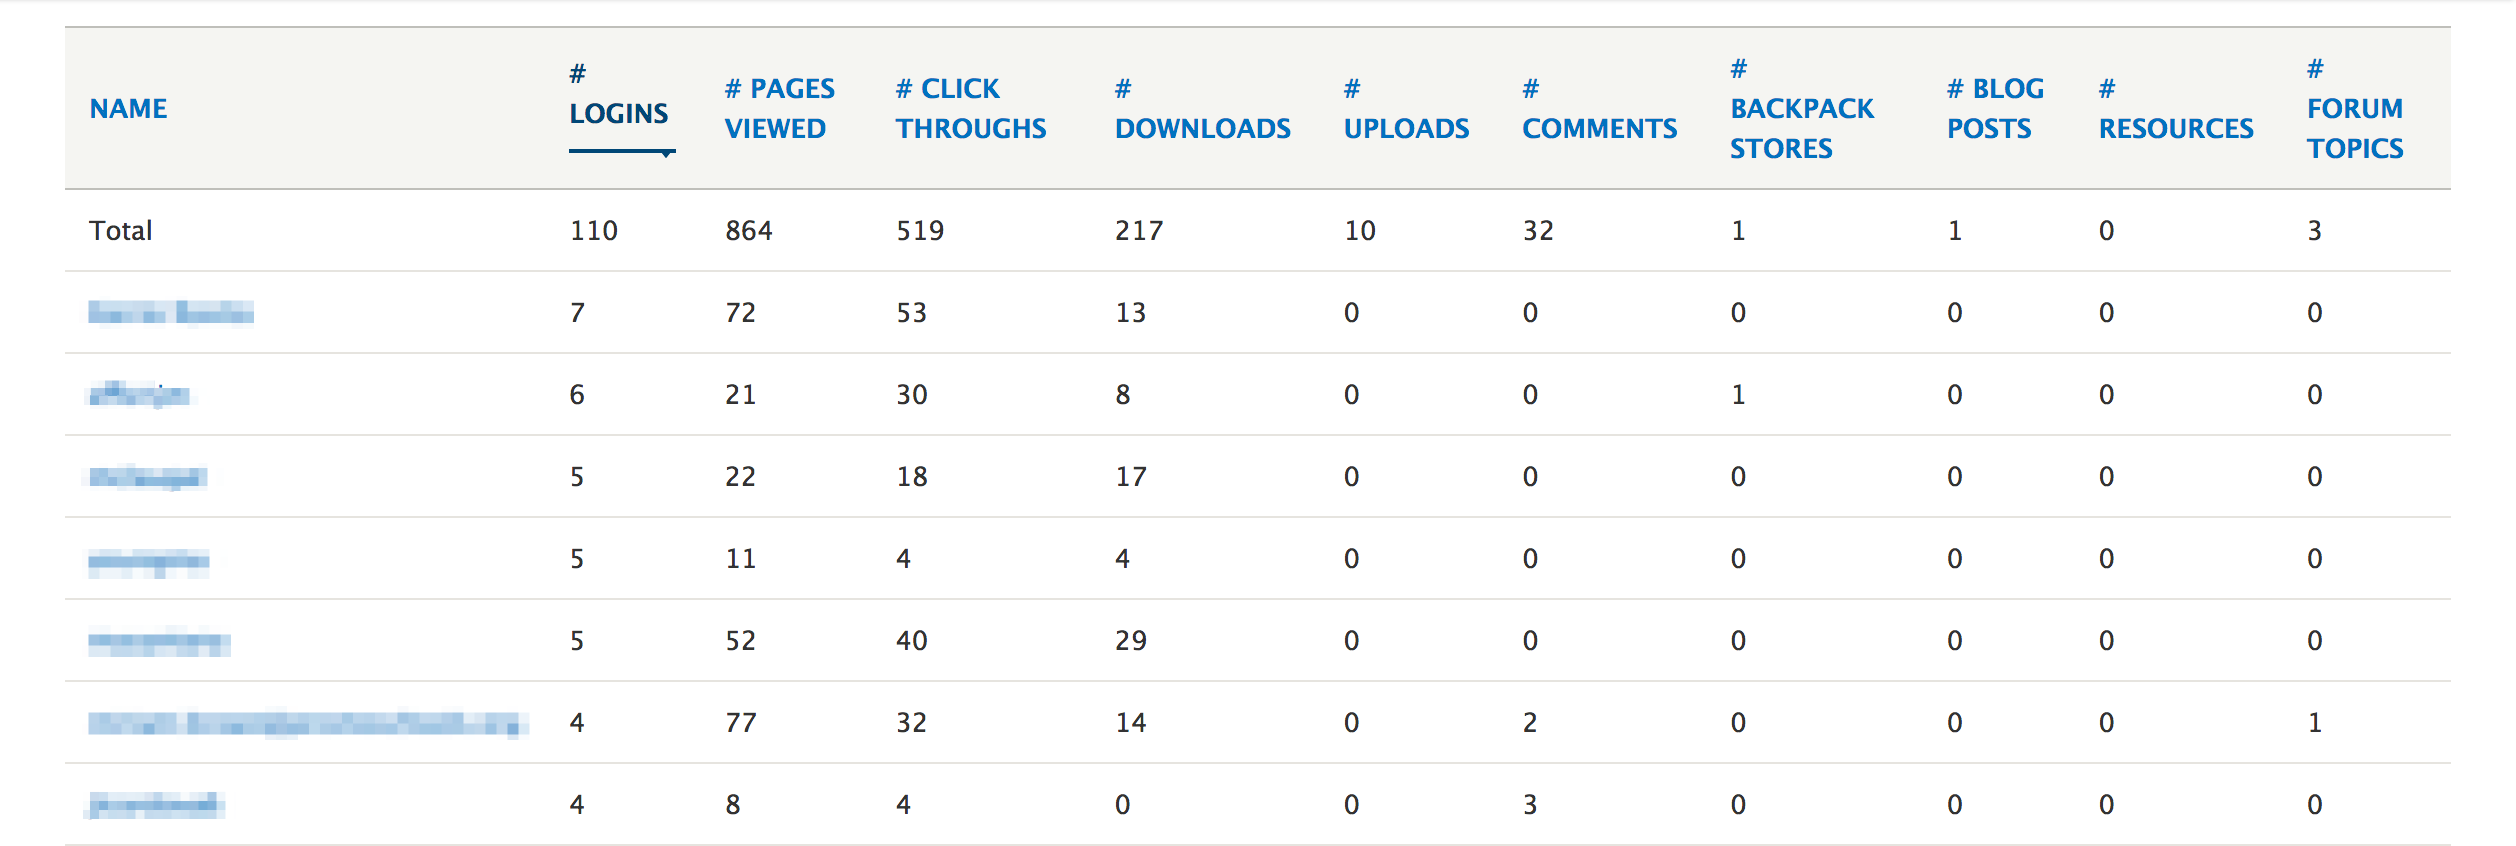 Teachers With Guts began tracking user engagement to inform how they manage their online portal.
Other opportunities to share analytics include weekly email reports, a user dashboard upon logging in, or via mobile texting or apps. Don’t be shy about asking your team where they would most likely notice the data you’re sharing with them.
Meaningful, Informed Conversations
By showing key data in high traffic areas, you foster an informed team. From there you can have the conversations you want and need. We now know which posts are getting the most reach and are evaluating why that is. As a result, our best practices have evolved to make our writing more relevant with readers.
This month, the National Institute for Children's Health Quality is celebrating Agaric's support in making the most of the digital health revolution, part of their 20th anniversary campaign.
It got us thinking about how long we've been working in the space. Indeed, Agaric is proud to have been helping medical and scientific communities almost from our founding.
 In 2008, we started building biomedical web communities enriched by semantic data. Working with researchers Sudeshna Das of Harvard University and Tim Clark of Massachusetts General Hospital, both affiliated with Harvard's Initiative in Innovative Computing, we were the primary software developers for the Scientific Collaboration Framework, a reusable platform for advanced, structured, online collaboration in biomedical research that leveraged reference ontologies for the biomedical domain. Making use of academic groups actively publishing controlled vocabularies and making data available in the Resource Description Framework (RDF) language, we built on work done by Stéphane Corlosquet, a lead developer in adding RDF to the Drupal content management system, to build the Science Collaboration Framework. SCF supported structured ‘Web 2.0’ style community discourse amongst researchers when that was a new thing, and made heterogeneous data resources available to the collaborating scientist, and captured the semantics of the relationship among the resources giving structure to the discourse around the resources.
Read more about it in Building biomedical web communities using a semantically aware content management system in Briefings in Bioinformatics from Oxford Academic.
Agaric led the work of building the website for an online community of Parkinson's disease researchers and research investors, on the Science Collaboration Framework, for the Michael J. Fox Foundation for Parkinson's Research.
In 2012, we worked with Partners In Health to create a site for people on the front lines of combatting tuberculosis to share and discuss approaches.
In 2015, we began contributing to the Platform for Collaborative and Experimental Ethnography. PECE is "a Free and Open Source (Drupal-based) digital platform that supports multi-sited, cross-scale ethnographic and historical research. PECE is built as a Drupal distribution to be improved and extended like any other Drupal project." We primarily worked on the integration of PECE's bibliography capabilities with Zotero's online collaborative bibliography services.
Also in 2015, we took on the exciting work of rebuilding the Collaboratory—a platform designed specifically to help improvement teams collaborate, innovate, and make change—for the National Institute for Children's Health Quality. We're proud to be NICHQ's 2020 partners in making the most of the digital health revolution.
All in all, we're impressed by our twelve years of building sites for the scientific and medical communities, and looking forward to helping shape a healthy future.
Drutopia Platform by Agaric
A libre website builder for liberation, hosted cooperatively
Resources
- Presentation slides
- drupal.org/project/mposse - Microblog Publish (on your) Own Site, Syndicate Elsewhere (MPOSSE) module
- drupal.org/project/social_post - Social Post module, part of the Drupal Social Initiative and is based on the Social API.
- drupal.org/project/social_post_mastodon - Social Post Mastodon module
- drupal.org/project/social_post_facebook - Social Post Facebook module
- drupal.org/project/bsky
- Not on Social Post, but works with MPOSSE with this issue fork: Implement Social Platform plugin from MPOSSE [#3536172] | Drupal.org