Today we will learn how to migrate content from a Comma-Separated Values (CSV) file into Drupal. We are going to use the latest version of the Migrate Source CSV module which depends on the third-party library league/csv. We will show how configure the source plugin to read files with or without a header row. We will also talk about a new feature that allows you to use stream wrappers to set the file location. Let’s get started.
Getting the code
You can get the full code example at https://github.com/dinarcon/ud_migrations The module to enable is UD CSV source migration whose machine name is ud_migrations_csv_source. It comes with three migrations: udm_csv_source_paragraph, udm_csv_source_image, and udm_csv_source_node.
You can get the Migrate Source CSV module is using composer: composer require drupal/migrate_source_csv. This will also download its dependency: the league/csv library. The example assumes you are using 8.x-3.x branch of the module, which requires composer to be installed. If your Drupal site is not composer-based, you can use the 8.x-2.x branch. Continue reading to learn the difference between the two branches.
Understanding the example set up
This migration will reuse the same configuration from the introduction to paragraph migrations example. Refer to that article for details on the configuration: the destinations will be the same content type, paragraph type, and fields. The source will be changed in today's example, as we use it to explain JSON migration. The end result will again be nodes containing an image and a paragraph with information about someone’s favorite book. The major difference is that we are going to read from JSON.
Note that you can literally swap migration sources without changing any other part of the migration. This is a powerful feature of ETL frameworks like Drupal’s Migrate API. Although possible, the example includes slight changes to demonstrate various plugin configuration options. Also, some machine names had to be changed to avoid conflicts with other examples in the demo repository.
Migrating CSV files with a header row
In any migration project, understanding the source is very important. For CSV migrations, the primary thing to consider is whether or not the file contains a row of headers. Other things to consider are what characters to use as delimiter, enclosure, and escape character. For now, let’s consider the following CSV file whose first row serves as column headers:
unique_id,name,photo_file,book_ref
1,Michele Metts,P01,B10
2,Benjamin Melançon,P02,B20
3,Stefan Freudenberg,P03,B30
This file will be used in the node migration. The four columns are used as follows:
-
unique_idis the unique identifier for each record in this CSV file. -
nameis the name of a person. This will be used as the node title. -
photo_fileis the unique identifier of an image that was created in a separate migration. -
book_refis the unique identifier of a book paragraph that was created in a separate migration.
The following snippet shows the configuration of the CSV source plugin for the node migration:
source:
  plugin: csv
  path: modules/custom/ud_migrations/ud_migrations_csv_source/sources/udm_people.csv
  ids: [unique_id]
The name of the plugin is csv. Then you define the path pointing to the file itself. In this case, the path is relative to the Drupal root. Finally, you specify an ids array of columns names that would uniquely identify each record. As already stated, the unique_id column servers that purpose. Note that there is no need to specify all the columns names from the CSV file. The plugin will automatically make them available. That is the simplest configuration of the CSV source plugin.
The following snippet shows part of the process, destination, and dependencies configuration of the node migration:
process:
  field_ud_image/target_id:
    plugin: migration_lookup
    migration: udm_csv_source_image
    source: photo_file
destination:
  plugin: 'entity:node'
  default_bundle: ud_paragraphs
migration_dependencies:
  required:
    - udm_csv_source_image
    - udm_csv_source_paragraph
  optional: []
Note that the source for the setting the image reference is photo_file. In the process pipeline you can directly use any column name that exists in the CSV file. The configuration of the migration lookup plugin and dependencies point to two CSV migrations that come with this example. One is for migrating images and the other for migrating paragraphs.
Migrating CSV files without a header row
Now let’s consider two examples of CSV files that do not have a header row. The following snippets show the example CSV file and source plugin configuration for the paragraph migration:
B10,The definite guide to Drupal 7,Benjamin Melançon et al.
B20,Understanding Drupal Views,Carlos Dinarte
B30,Understanding Drupal Migrations,Mauricio Dinarte
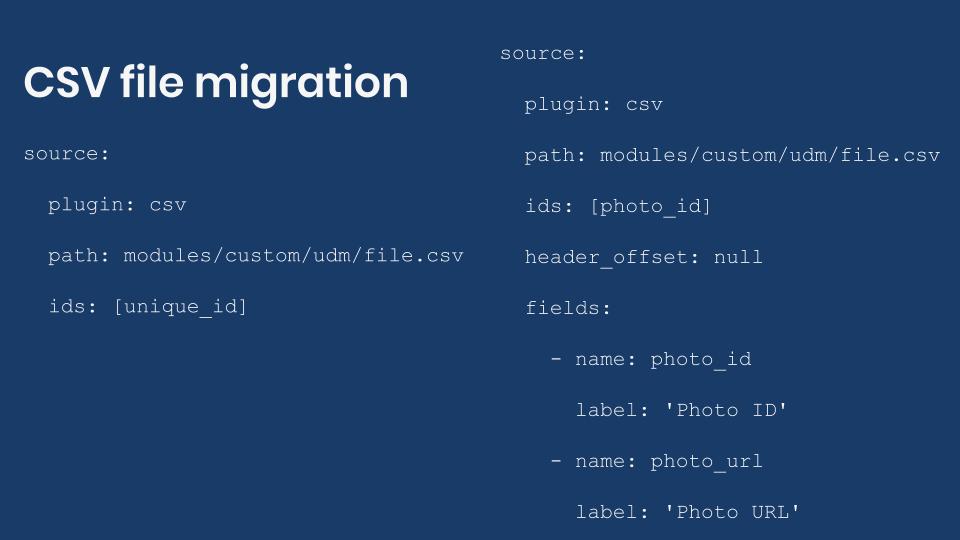
source:
  plugin: csv
  path: modules/custom/ud_migrations/ud_migrations_csv_source/sources/udm_book_paragraph.csv
  ids: [book_id]
  header_offset: null
  fields:
    - name: book_id
    - name: book_title
    - name: 'Book author'
When you do not have a header row, you need to specify two more configuration options. header_offset has to be set to null. fields has to be set to an array where each element represents a column in the CSV file. You include a name for each column following the order in which they appear in the file. The name itself can be arbitrary. If it contained spaces, you need to put quotes (') around it. After that, you set the ids configuration to one or more columns using the names you defined.
In the process section you refer to source columns as usual. You write their name adding quotes if it contained spaces. The following snippet shows how the process section is configured for the paragraph migration:
process:
  field_ud_book_paragraph_title: book_title
  field_ud_book_paragraph_author: 'Book author'
The final example will show a slight variation of the previous configuration. The following two snippets show the example CSV file and source plugin configuration for the image migration:
P01,https://agaric.coop/sites/default/files/pictures/picture-15-1421176712.jpg
P02,https://agaric.coop/sites/default/files/pictures/picture-3-1421176784.jpg
P03,https://agaric.coop/sites/default/files/pictures/picture-2-1421176752.jpg
source:
  plugin: csv
  path: modules/custom/ud_migrations/ud_migrations_csv_source/sources/udm_photos.csv
  ids: [photo_id]
  header_offset: null
  fields:
    - name: photo_id
      label: 'Photo ID'
    - name: photo_url
      label: 'Photo URL'
For each column defined in the fields configuration, you can optionally set a label. This is a description used when presenting details about the migration. For example, in the user interface provided by the Migrate Tools module. When defined, you do not use the label to refer to source columns. You keep using the column name. You can see this in the value of the ids configuration.
The following snippet shows part of the process configuration of the image migration:
process:
  psf_destination_filename:
    plugin: callback
    callable: basename
    source: photo_url
CSV file location
When setting the path configuration you have three options to indicate the CSV file location:
- Use a relative path from the Drupal root. The path should not start with a slash (/). This is the approach used in this demo. For example,
modules/custom/my_module/csv_files/example.csv. - Use an absolute path pointing to the CSV location in the file system. The path should start with a slash (/). For example,
/var/www/drupal/modules/custom/my_module/csv_files/example.csv. - Use a stream wrapper. This feature was introduced in the 8.x-3.x branch of the module. Previous versions cannot make use of them.
Being able to use stream wrappers gives you many options for setting the location to the CSV file. For instance:
- Files located in the public, private, and temporary file systems managed by Drupal. This leverages functionality already available in Drupal core. For example:
public://csv_files/example.csv. - Files located in profiles, modules, and themes. You can use the System stream wrapper module or apply this core patch to get this functionality. For example,
module://my_module/csv_files/example.csv. - Files located in remote servers including RSS feeds. You can use the Remote stream wrapper module to get this functionality. For example,
https://understanddrupal.com/csv-files/example.csv.
CSV source plugin configuration
The configuration options for the CSV source plugin are very well documented in the source code. They are included here for quick reference:
-
pathis required. It contains the path to the CSV file. Starting with the 8.x-3.x branch, stream wrappers are supported. -
idsis required. It contains an array of column names that uniquely identify each record. -
header_offsetis optional. The index of record to be used as the CSV header and the thereby each record's field name. It defaults to zero (0) because the index is zero-based. For CSV files with no header row the value should be set tonull. -
fieldsis optional. It contains a nested array of names and labels to use instead of a header row. If set, it will overwrite the column names obtained fromheader_offset. -
delimiteris optional. It contains one character column delimiter. It defaults to a comma (,). For example, if your file uses tabs as delimiter, you set this configuration to\t. -
enclosureis optional. It contains one character used to enclose the column values. Defaults to double quotation marks ("). -
escapeis optional. It contains one character used for character escaping in the column values. It defaults to a backslash (****).
Important: The configuration options changed significantly between the 8.x-3.x and 8.x-2.x branches. Refer to this change record for a reference of how to configure the plugin for the 8.x-2.x.
And that is how you can use CSV files as the source of your migrations. Because this is such a common need, it was considered to move the CSV source plugin to Drupal core. The effort is currently on hold and it is unclear if it will materialize during Drupal 8’s lifecycle. The maintainers of the Migrate API are focusing their efforts on other priorities at the moment. You can read this issue to learn about the motivation and context for offering functionality in Drupal core.
Note: The Migrate Spreadsheet module can also be used to migrate data from CSV files. It also supports Microsoft Office Excel and LibreOffice Calc (OpenDocument) files. The module leverages the PhpOffice/PhpSpreadsheet library.
What did you learn in today’s blog post? Have you migrated from CSV files before? Did you know that it is now possible to read files using stream wrappers? Please share your answers in the comments. Also, I would be grateful if you shared this blog post with others.
Next: Migrating JSON files into Drupal
This blog post series, cross-posted at UnderstandDrupal.com as well as here on Agaric.coop, is made possible thanks to these generous sponsors: Drupalize.me by Osio Labs has online tutorials about migrations, among other topics, and Agaric provides migration trainings, among other services. Contact Understand Drupal if your organization would like to support this documentation project, whether it is the migration series or other topics.
Sign up to be notified when Agaric gives a migration training:


Comments
2020 June 03
Renaud
This tutorial made me…
This tutorial made me realize that I put all the migration modules from your GitHub repo in the wrong directory of my local environment. This is my mistake by all means.
Looking back at the instructions in Writing your first Drupal migration, I think they could be slightly improved from this
to this:
The repository, which will be used for many examples throughout the series, can be downloaded at https://github.com/dinarcon/ud_migrations Unzip the package and rename it ud_migrations. Place it into the `./modules/custom` directory of the Drupal installation so that the path to the README is
modules/custom/ud_migrations/README.md. The example above is part of the “UD First Migration” submodule so make sure to enable it.* * *
One last thing, the last line of most code snippets is justified left i.e. the indentation is broken.
2020 June 18
Mauricio Dinarte
Hi Renaud, You are right,…
Hi Renaud,
You are right, the instructions were not accurate. As the series progressed, we decided to put all the modules under the same repository. This way all the examples could be obtained in one place. In fact, many examples had to be adjusted to avoid conflicts with examples later on. We have updated the article and included a text representation of the hierarchy of the module location for reference.
Good catch on the indentation of the last lines. No clue how that happened, but they had been fixed.
Thanks for your report.
Add new comment